From the archive
Crop or move? Read a three-frame contact sheet
Use a foreground object and a doorway to see what changes when you crop, change focal length, or move the camera.
The Camera Notebook · · Updated

Put a backpack in front of a doorway. Take a wide picture, a tighter picture, and then a second wide picture from closer up. In both wide pictures the lens can be the same. The clue is what the doorway does relative to the bag.
Compare the two frames from the mark
In the wide frame, identify the top of the bag and the top of the doorway. Change to a longer focal length from the same camera position and aim, then compare the two. If you crop the wider picture to the tighter angle and align their centers, the two objects should largely line up. Both objects got larger in the frame together. Any obvious shift is a reason to check that the camera did not rotate or move. Lens distortion, aspect ratio and changes in effective angle as you focus can keep real pictures from matching exactly.
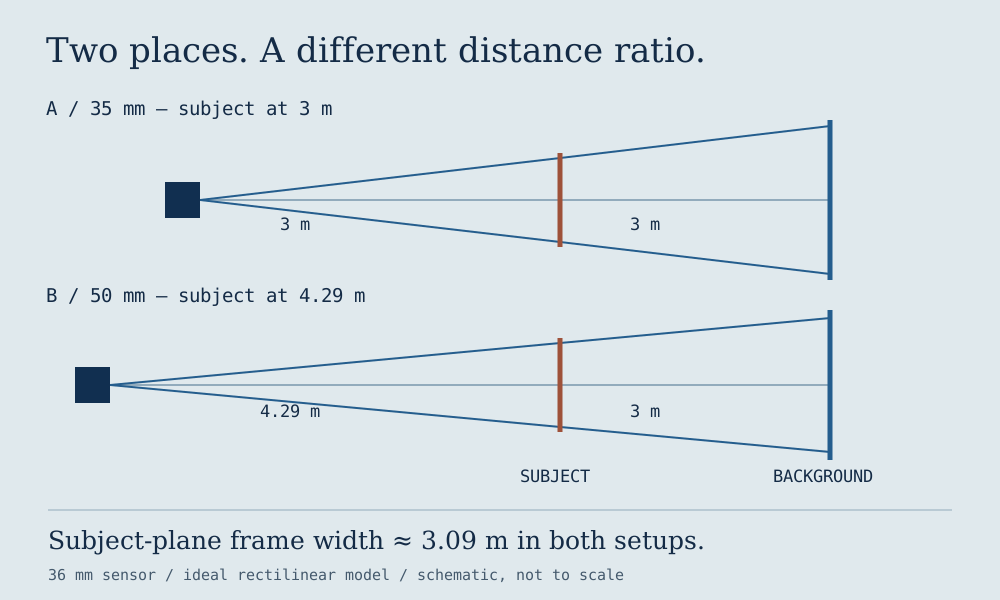
Use the width planner before you go out. At a distance of 3 m, an ideal rectilinear 35 mm lens on 36 mm full frame covers approximately 3.09 m across a plane perpendicular to the camera axis. At 50 mm the estimate is 2.16 m. Those numbers describe what fits side to side at the bag’s distance. They do not tell you how the lens blurs the doorway or whether the corners are sharp.
Compare the two frames with the same bag size
Return to the shorter focal length. Move closer until the bag takes up roughly the same proportion of the frame as it did in the tight picture. To make this easier, compare how much of the bag’s height fits between the horizontal grid lines. Keep the camera at the same height. The bag is now substantially closer; the doorway is still relatively far back. So the doorway often ends up smaller relative to the bag. The change comes from where the camera was placed.

Read a real shooting constraint
If you need to show a person in their surroundings, try choosing the camera position for a comfortable relationship between the person and background first. From there, pick a focal length that fits the edges you want. If your back hits a wall before you find the right position, note the limitation. A wider lens may fit more in the frame from there; it does not buy you more physical room or reproduce a viewpoint you cannot reach.
Keep the three images together and write the actual focal length and camera position below each. The full field exercise includes the single-lens version and a checklist for making the comparison.
Before repeating the exercise, explore the camera position study to see the subject and background planes from above.
Sources
Related equipment and reading
Composition reading and an optional support reference for the three-frame exercise. The article does not identify your camera or its mounting requirements.
As an Amazon Associate I earn from qualifying purchases. These are optional references, not product tests or live offers.
The Photographer’s Eye · Definitive Edition · Paperback
Michael Freeman’s definitive paperback is a composition-reading companion for comparing frame edges. It has no lens-mount or body requirement.
Michael Freeman’s definitive edition, paperback ISBN 9781840918878. Keep it separate from the ebook and earlier editions.
Manfrotto Befree Advanced · MKBFRTA4BK-BH
An optional complete tripod-kit reference for keeping a viewpoint fixed. Confirm the exact included head/plate, total camera-and-lens load and stability; no payload or universal attachment fit is promised.
The selected listing names the unsuffixed aluminum twist-lock kit. It is not labelled as the BHUS regional package; check the exact contents.
Lens and mount checks · Rehearse on a kit zoom · Try the field exercise